SEBI rules require traders in the Indian stock market to log into their broker’s terminal daily. While this can be done manually as part of a routine, it’s also possible to automate the process.
Now there are countless ways. The two most popular ways -
Python Requests Module:
May violate Terms and Conditions related to web scraping with various brokers.
Involves directly sending data to endpoint URLs.
Selenium:
Considered legal for this purpose.
Mimics browser automation, rather than direct data requests.
In this tutorial, we’ll explore Selenium and demonstrate how to automate login on Upstox using Python Selenium.
Prerequisites:
Familiarity with Python: You should already understand what Python is and have Selenium installed in your Python environment.
Jupyter Notebook: Ensure you have Jupyter installed and can open a blank notebook.
TOTP Key from Upstox: You’ll need a Time-based One-Time Password (TOTP) key provided by Upstox. If you’re unsure how to obtain this, watch this instructional video: Get your TOTP key from Upstox.
Note: We won’t cover Python basics in this video as there are already many tutorials available for beginners. Please refer to those if you need an introduction to Python.
Now our task is to automate the code-getting process from this URL - https://api-v2.upstox.com/login/authorization/dialog?response_type=code&client_id=0daa59e7-9f62-4555-8fd0-6fbee8da3913&redirect_uri=https://www.unofficed.com/
The Selenium module only works in headless mode on Google Collab. Therefore, we’ll use a local Jupyter environment instead. I’ll be sharing pieces of code and explaining them as we go.
You can watch the videos covering the entire process for a comprehensive understanding.I’ll break down each line of the code for clarity:
[Video Link]
import time

from selenium import webdriver
from selenium.webdriver.chrome.options import Options
import time:
This line imports the time module from Python’s standard library. The time module provides various time-related functions. It’s often used in web scraping and browser automation to introduce delays (like waiting for a page to load) or for time-stamping.
from selenium import webdriver:
Here, you’re importing the webdriver module from the selenium package.
Selenium is a popular tool for automating web browsers. It allows you to programmatically control a web browser programmatically, like opening URLs, clicking on links, filling out forms, etc.
The webdriver is a key component in Selenium. It provides a way to interact with different browsers (like Chrome, Firefox, etc.) You can think of it as a driver that controls the browser.
from selenium.webdriver.chrome.options import Options:
This line imports the Options class for the Chrome webdriver from the Selenium package.
The Options class allows you to set various options for the Chrome browser. For example, you can start the browser in headless mode (where the browser UI is not displayed), disable images or JavaScript, set the window size, etc.
These options are used to customize the behavior of the Chrome browser when it is automated using Selenium.
By typing options = Options(), what we’re doing is initializing a new Options object.
This object is going to store all the different settings or preferences we might want to apply to our Chrome browser. It’s like creating a configuration blueprint for the browser.
options.add_argument('--no-sandbox')
options.add_argument: This method is used to add various command-line arguments to the Chrome Options object. These arguments modify the behavior of the Chrome browser when it’s being controlled by Selenium.
'--no-sandbox': This particular argument is used to disable the Chrome sandbox feature. The sandbox is a security feature that isolates browser processes. Disabling it is often necessary in certain automated environments, like when running Chrome in a Docker container, but it can increase security risks, so it’s typically only used when absolutely necessary.
Here are the arguments formatted in the same way as your code snippet, ready for use in a Selenium script:
options.add_argument('--headless')
Runs Chrome in headless mode, where the browser operates without displaying its graphical user interface.
options.add_argument('--disable-gpu')
This argument is often paired with headless mode, especially on Windows systems, to work around some older bugs.
options.add_argument('--start-maximized')
Opens the Chrome browser window maximized to the full screen.
options.add_argument('--incognito')
Launches Chrome in incognito mode, which means it won’t save cookies or browsing history.
options.add_argument('--disable-extensions')
Prevents Chrome from loading any extensions, which can be useful for improving performance and security in automated tasks.
options.add_argument('--disable-popup-blocking')
Disables the popup blocking feature in Chrome, helpful if your automation needs to interact with popups.
options.add_argument('--disable-infobars')
Prevents Chrome from displaying certain information bars, like notifications that Chrome is being controlled by automated software.
Each of these arguments alters the behavior of the Chrome browser in specific ways, allowing you to tailor the browser environment to suit the needs of your automated tasks.
This line defines the URL that you want to navigate to in the browser. It’s stored in a variable named url.
driver.get(url):
The get method of the driver object is used to navigate to the URL stored in the url variable. This will open the specified web page in the Chrome browser.
from selenium.webdriver.support.ui import WebDriverWait:
This line imports WebDriverWait from Selenium, which is a utility used to wait for a certain condition to occur before proceeding.
The wait_for_page_load function:
You’ve defined a function wait_for_page_load that takes driver and an optional timeout parameter.
Inside the function, WebDriverWait(driver, timeout).until(...) is used. This tells Selenium to wait until a certain condition is met, in this case, for the page to fully load.
lambda d: d.execute_script('return document.readyState') == 'complete': This lambda function checks if the page has finished loading by executing JavaScript in the browser to check the document’s ready state. If it’s 'complete', the page is fully loaded.
wait_for_page_load(driver):
Finally, you call the wait_for_page_load function with the driver as an argument. This will apply the waiting mechanism to ensure that the page is fully loaded before the script continues.
from selenium.webdriver.common.by import By:
This line imports By from Selenium. By is an enumerator for various methods of locating elements in a page (like by ID, XPath, CSS selector, etc.).
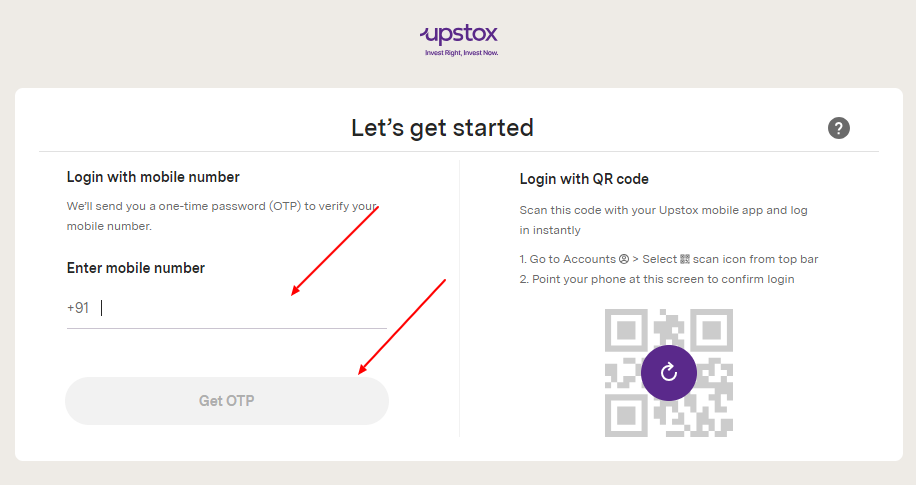
client_id = '9658986525':
You’re defining a variable client_id and assigning a string value to it. This appears to be a user ID or a phone number that will be used later in the script.
username_input_xpath = '//*[@id="mobileNum"]':
Here, you’re specifying the XPath of an element in the web page, and assigning it to the variable username_input_xpath. This XPath is designed to locate an element with the ID mobileNum, presumably an input field for the username or mobile number.
username_input_element = driver.find_element(By.XPATH, username_input_xpath):
This line uses the find_element method of the Selenium WebDriver (driver) to locate the first element on the page that matches the specified XPath (username_input_xpath). The located element is stored in the variable username_input_element.
username_input_element.clear():
The clear method is called on the located input element to remove any pre-existing text. This ensures the field is empty before entering new data.
username_input_element.send_keys(client_id):
The send_keys method simulates typing into the input field. Here, it’s used to type the value stored in client_id into the username input field.
get_otp_button_xpath = '//*[@id="getOtp"]':
This line defines the XPath to locate the “Get OTP” button on the page. The XPath is designed to find an element with the ID getOtp.
get_otp_button_element = driver.find_element(By.XPATH, get_otp_button_xpath):
Similar to the username input element, this line finds the button element using its XPath.
get_otp_button_element.click():
Finally, the click method is called on the located button element. This simulates a click action, which is presumably intended to trigger an action (like sending an OTP) based on the entered client ID.
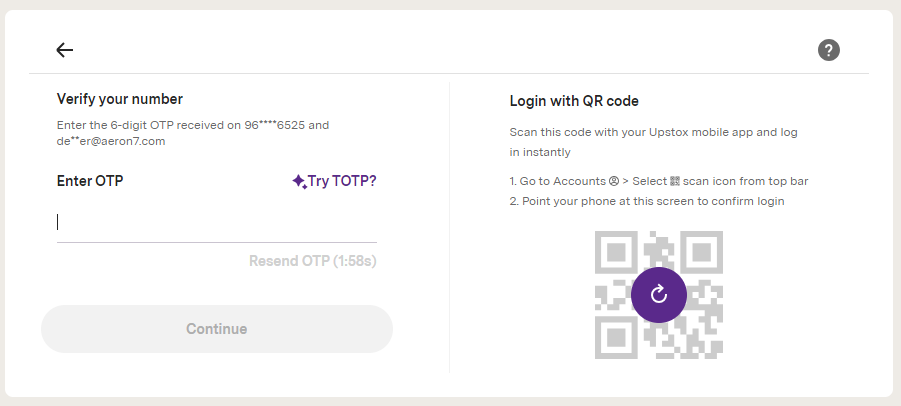
import pyotp:
This imports the pyotp library into your Python script. pyotp is a Python library that implements TOTP and HOTP (HMAC-based One-Time Password) algorithms, commonly used for two-factor authentication.
client_pass = '2Y7NW7SMVYKTTNLO3AKPDN4SZGGWV75Z':
We’re defining a variable client_pass and assigning it a secret key. This key is a string used in the generation of the one-time password. In a real-world application, this key should be kept confidential.
client_pass = pyotp.TOTP(client_pass).now():
pyotp.TOTP() creates a TOTP object. You’re passing the secret key (client_pass) to this object. The TOTP algorithm uses this key along with the current time to generate a temporary, unique password.
.now() is a method that computes the current one-time password based on the secret key and the current time. The TOTP password changes at a fixed interval, typically every 30 seconds.
The client_pass variable is being reassigned to this generated password.
This script locates and interacts with a password input field and a continue button on a web page using Selenium WebDriver. It enters the generated OTP (client_pass ) into the password field and then clicks the continue button to proceed.
Then comes the final step. Simple and Similar previous two steps.
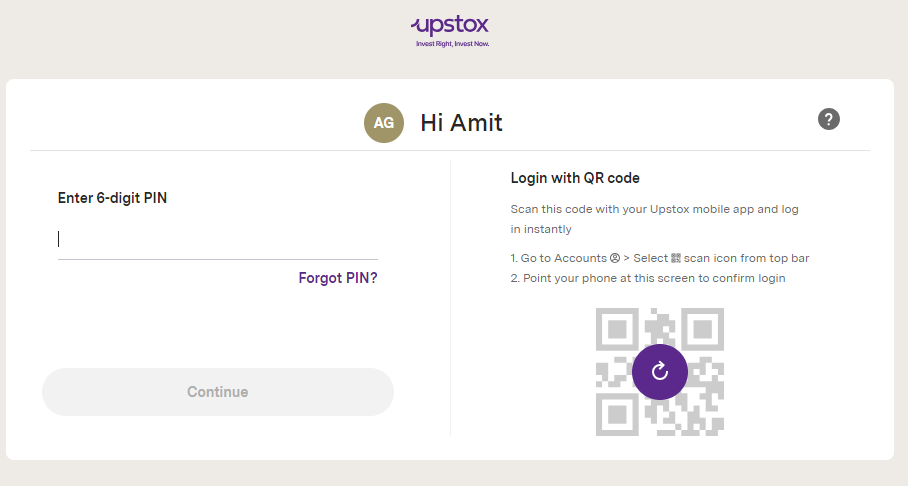
client_pin = "933319"  # Replace with the actual client pin

# XPath for the pin input field
pin_input_xpath = '//*[@id="pinCode"]'

# Find the pin input field and enter the pin
pin_input_element = driver.find_element(By.XPATH, pin_input_xpath)
pin_input_element.clear()
pin_input_element.send_keys(client_pin)
Now make sure to note the current url of the browser. You can see that by doing
driver.current_url
It will print
'https://login.upstox.com/'
Let’s save it to original_url variable -
original_url=driver.current_url
Now, the moment, We submit the pin, the URL gets changed.
original_url=driver.current_url

# XPath for the continue button after pin entry
pin_continue_button_xpath = '//*[@id="pinContinueBtn"]'

# Find the continue button and click it
pin_continue_button_element = driver.find_element(By.XPATH, pin_continue_button_xpath)
pin_continue_button_element.click()

from selenium.webdriver.support import expected_conditions as EC

WebDriverWait(driver, 30).until(EC.url_changes(original_url))

driver.current_url
The output is the redirected URL after login with the code -
'https://unofficed.com/?code=9J-ojV'
It uses WebDriverWait along with expected_conditions (aliased as EC ) to wait until the URL of the web page changes from original_url . This line ensures that the script pauses execution for up to 30 seconds or until the URL change is detected, whichever comes first.
Now We need to extract the code from this URL. It is a basic string. So let’s split it -